
You can sometimes install board and batten without removing your existing baseboards. The detail to settle first is where each vertical strip meets the trim along the floor.
The baseboard is the trim along the bottom of the wall; a batten is one of the vertical strips. If a batten sticks out farther than the baseboard’s upper edge, its bottom can leave a visible overhang. A curved or sloping top can make the joint awkward even when the pieces seem similar in thickness.
Before buying a wall’s worth of strips, hold a short batten sample above your baseboard. You may be able to meet it directly, add transition molding, or taper the batten ends. If none gives you the finish you want, consider replacing the baseboard.
Check where the batten will meet your baseboard
Look at the top of the baseboard, where the batten will end. Does it have a flat upper ledge, a rounded edge, or a decorative profile that slopes back toward the wall?
A shaped baseboard can be thick near the floor but much thinner at its top. Measuring its deepest part won’t tell you whether a batten will overhang the junction.
Hold the sample against the wall above the baseboard and look from the side. Compare how far its front face projects from the wall with the baseboard’s upper edge. Focus on where the pieces meet; their profiles don’t need to match everywhere.
Width and thickness affect different parts of the design:
- Face width: how wide the strip looks when you face the wall. This affects the pattern and spacing.
- Thickness: how far the strip projects outward. This affects the baseboard junction.
If you plan to use a backing panel, include it in the sample. When the panel sits against the wall above the existing baseboard and the batten sits on top, their thicknesses add together.
If you’re considering backing because your wall is textured, compare the options in our board and batten on textured walls guide.
For example, a 1/2-inch-thick batten over 1/4-inch backing projects 3/4 inch from a flat wall, before allowing for adhesive or unevenness. If the baseboard’s upper ledge projects only 1/2 inch from that same wall, the batten face extends 1/4 inch beyond it. These dimensions illustrate the calculation; they aren’t a recommended material combination.
Compare ways to keep the existing baseboard
| Approach | When to consider it | Appearance to check | Additional work |
|---|---|---|---|
| Meet the baseboard directly | The upper profile and batten depth already make a suitable junction | A flush face or a deliberate ledge | Measure and cut battens to meet the existing top |
| Add transition molding | You want a continuous trim detail between the battens and retained base | An extra horizontal profile above or around the baseboard | Choose a compatible profile and resolve its ends |
| Shape the batten end | You are willing to show a taper where a thicker batten meets thinner trim | A visible angled end on each batten | Make and check a sample cut before repeating it |
Meet the baseboard directly
Start here if your baseboard has a suitable flat top. Hold the sample in place and check the appearance from both the front and side.
The batten and baseboard faces don’t have to align exactly. A baseboard that projects beyond the battens can leave a visible ledge. American Millwork’s Fortitude kit, for example, pairs 1/4-inch vertical boards with a 1/2-inch baseboard. The kit calls for replacing the existing baseboard. Its dimensions show that the pieces can differ in thickness, but don’t establish that the kit will work with your retained trim. American Millwork installation instructions.
If your batten projects beyond the upper edge instead, decide whether that exposed bottom is acceptable before attaching it. A wider strip won’t solve a depth mismatch.
Add a transition molding
An extra piece of trim may create a continuous horizontal detail above or around the original baseboard. Woodgrain describes combining molding profiles into build-ups, including adding decorative molding in front of an existing baseboard. Its examples show the general approach, but don’t verify a batten-to-baseboard joint for your particular profile. Woodgrain’s molding build-up examples.
Check how the molding sits against the wall and existing trim, where the battens will meet it, and how far its face projects. You need the actual profile and dimensions to judge the fit; the molding’s name alone won’t tell you.
Hold the molding, batten and any backing together. Look for a gap above a curved baseboard top, an unwanted ledge or a new overhang. Then step back and judge the horizontal line it adds to the design.
Choose the profile first. How you attach and finish it depends on the materials and arrangement you settle on.
Shape the batten end
An angled end is another option when you want to retain thinner baseboards. The Home Depot’s board-and-batten guide includes cutting the batten bottoms at an angle as an alternative to removing the original baseboards. The Home Depot project guide.
Tapering changes the visible bottom of the strip. It does not move the rest of the batten’s front face back toward the wall, so it won’t make the whole assembly flush.
Make one sample before cutting all the battens. Check the taper beside your baseboard, then look along the wall to judge how the repeated angled ends will appear. Base the detail on your measured profile; a standard angle won’t necessarily suit it.
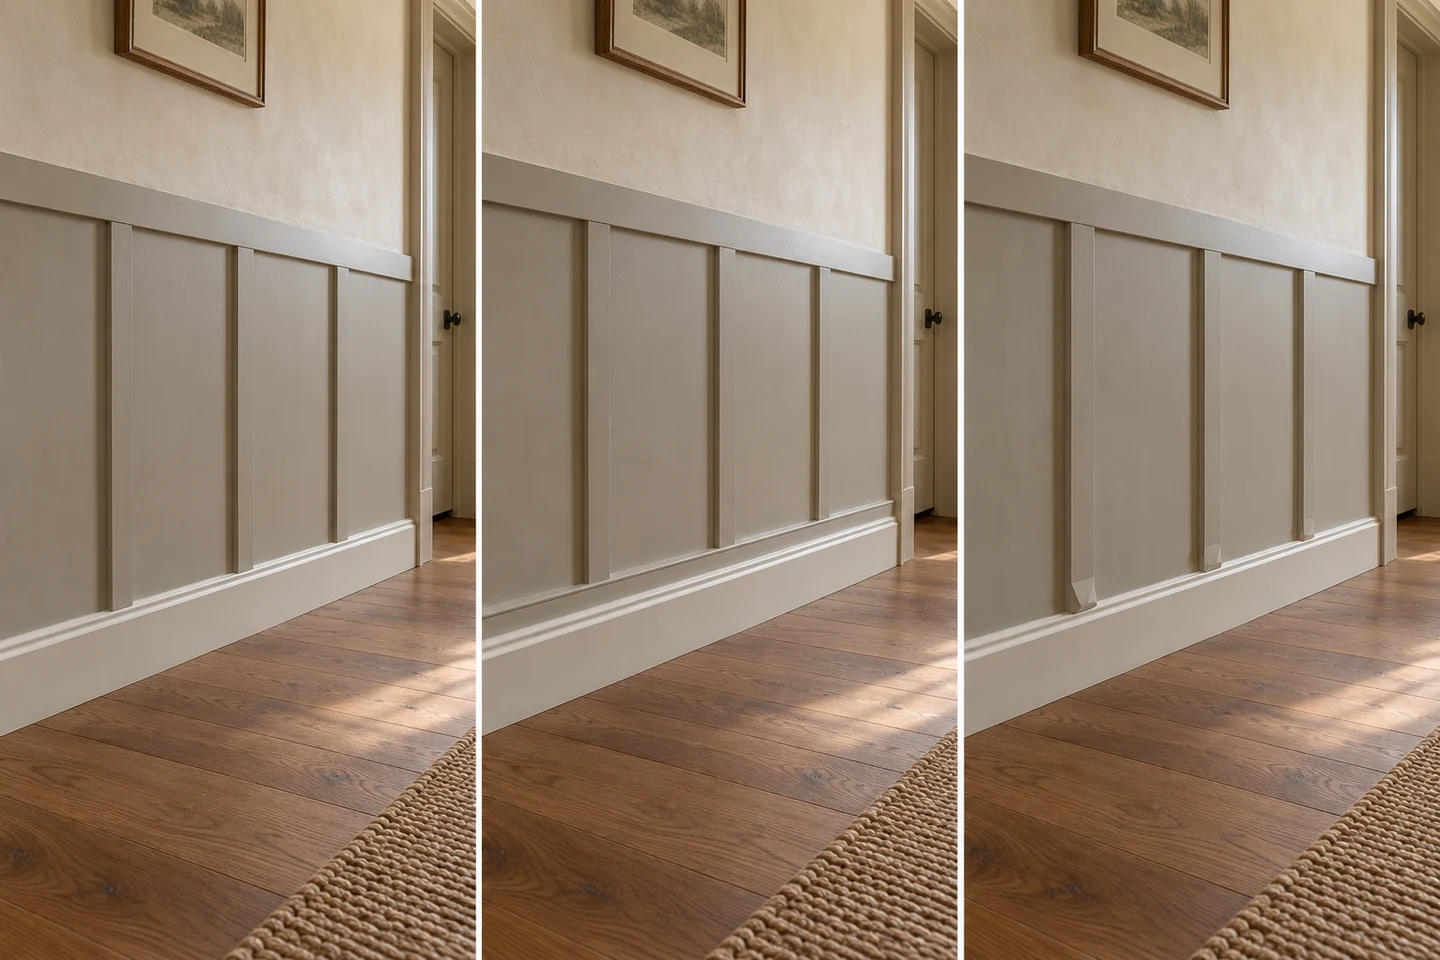
Direct meeting
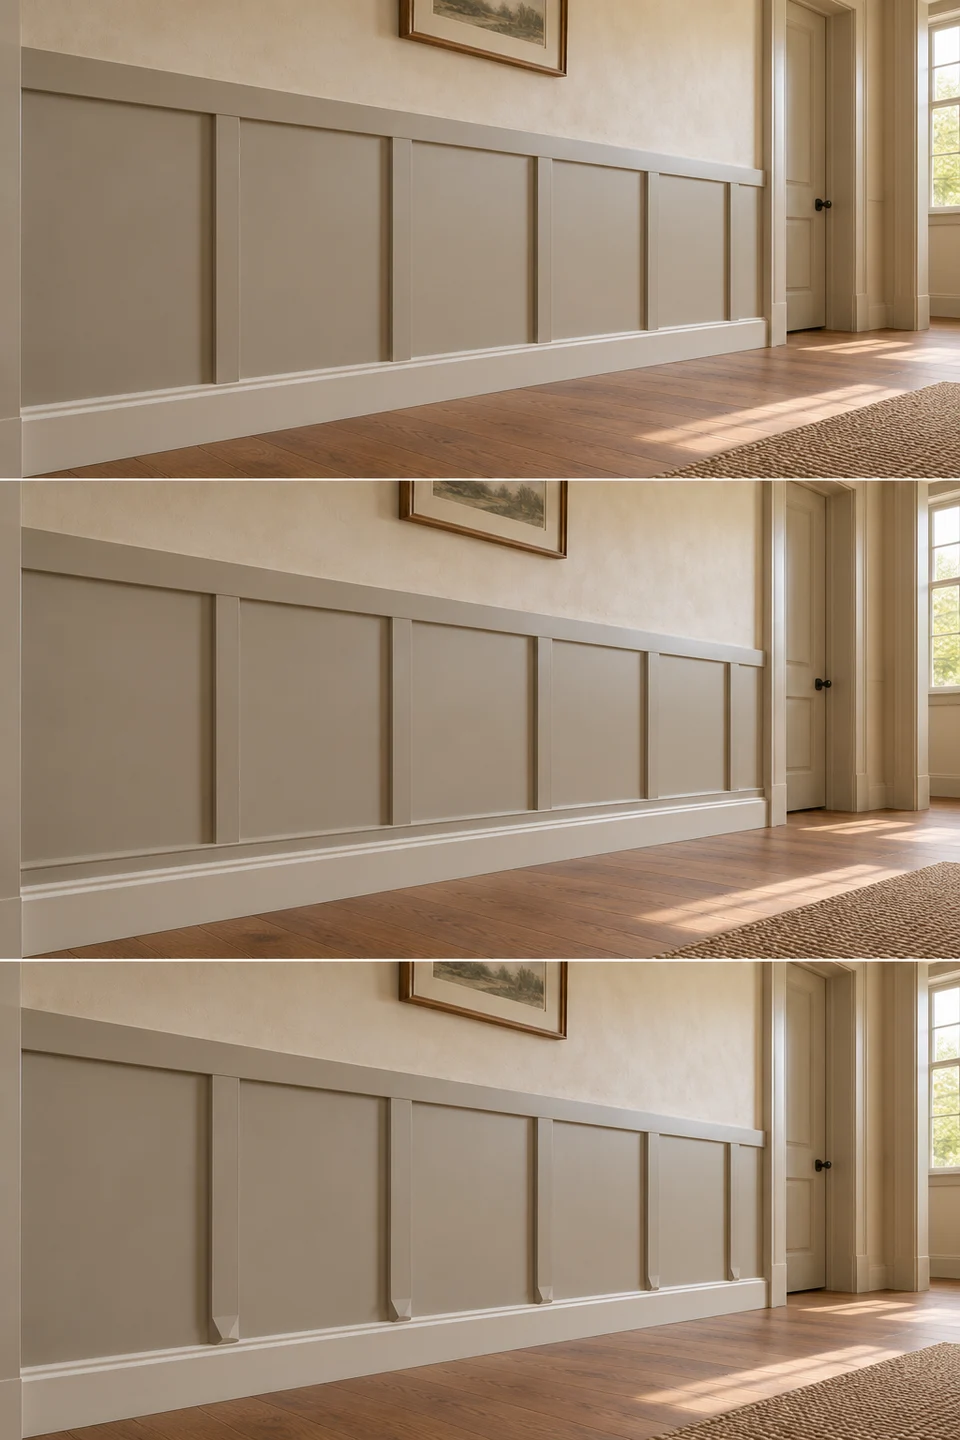
Transition trim
Tapered end
Check how the transition ends
Once the middle of the wall looks right, check both ends. Added transition trim that works beneath the battens may leave an exposed cut edge where an accent wall stops.
At a doorway, compare the proposed depth with the door casing. At a corner, consider how it meets the baseboard on the adjoining wall. If the paneling ends partway along a wall, decide how the added trim will finish there.
The ends may change which approach you prefer. Keeping the original baseboard can still mean working out a new end detail for added trim. Include that end in your sample comparison before choosing the molding.
When replacing the baseboard makes more sense
Consider replacement if keeping the baseboard would require extra trim or shaped batten ends you don’t like.
Choose a flat-topped replacement with the depth of your battens and backing in mind. Check the samples together; matching product labels don’t guarantee that the faces will line up.
You might also prefer replacement if an added transition makes the bottom of the wall look too layered. That is a matter of appearance. Board and batten doesn’t always require a new baseboard.
For a purchased kit, check its installation instructions before changing the specified assembly. The baseboard may be part of the manufacturer’s intended detail.
Try the junction before buying the full set
Gather a short batten sample, any backing you plan to use, and the transition molding you’re considering. Hold them together at the baseboard and check:
- From the front: do you like the horizontal line and the shape of the batten ends?
- From the side: is there an overhang, gap or ledge you didn’t expect?
- At the end: how will the detail meet a corner, door casing or unpaneled section?
Check more than one position along the wall if the trim or wall surface varies. Paint color can help you judge the appearance, but it won’t remove an overhang or make mismatched trim faces align.
Once you’ve settled the base detail, use the board and batten calculator to compare strip spacing and obstacle positions. Its diagram includes its own bottom rail. It won’t automatically substitute your existing baseboard or model the depth of this joint, so check its vertical cut lengths against your chosen base detail. Work out any tapered-end cuts separately, and keep the material sample to check physical fit.
Settle the junction with your actual materials before buying or cutting the full set. A short sample shows how the pieces meet at the bottom of the wall, which a front-view layout alone can’t tell you.